Jekyll2024-03-03T15:08:02+05:30http://www.codetolive.in//feed.xmlCode to liveAbout webNEGAmssql An error occurred while creating a new firewall rule Value cannot be null. (Parameter serverName)2024-03-03T00:00:00+05:302024-03-03T00:00:00+05:30http://www.codetolive.in//azure/mssql-An-error-occurred-while-creating-a-new-firewall-rule-Value-cannot-be-null-Parameter-serverNameYou are receiving the following error message because your IP address (client or local) has not been added to the Azure firewall on the Azure SQL Server.
Error: mssql An error occurred while creating a new firewall rule Value cannot be null. (Parameter serverName)
If you want to grant access to your local or client IP, then follow the below steps:
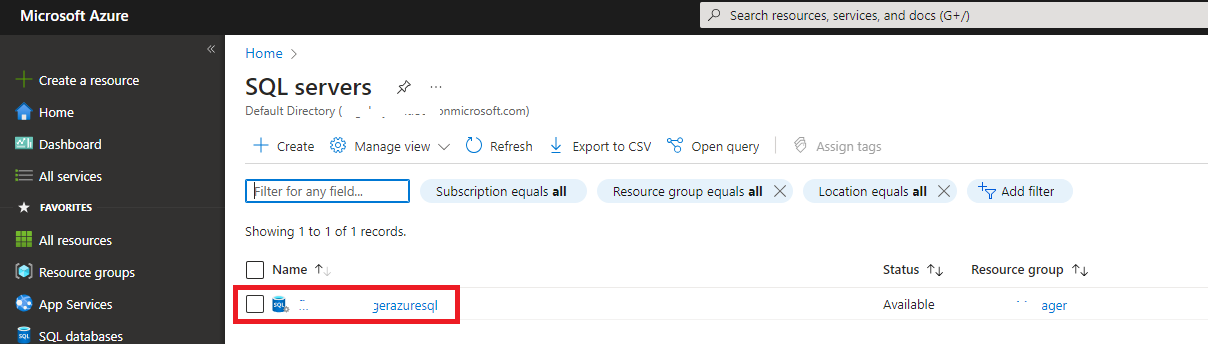
Select your SQL Server from the list to which you want to add the network firewall settings.
Fig 2. Azure SQL servers
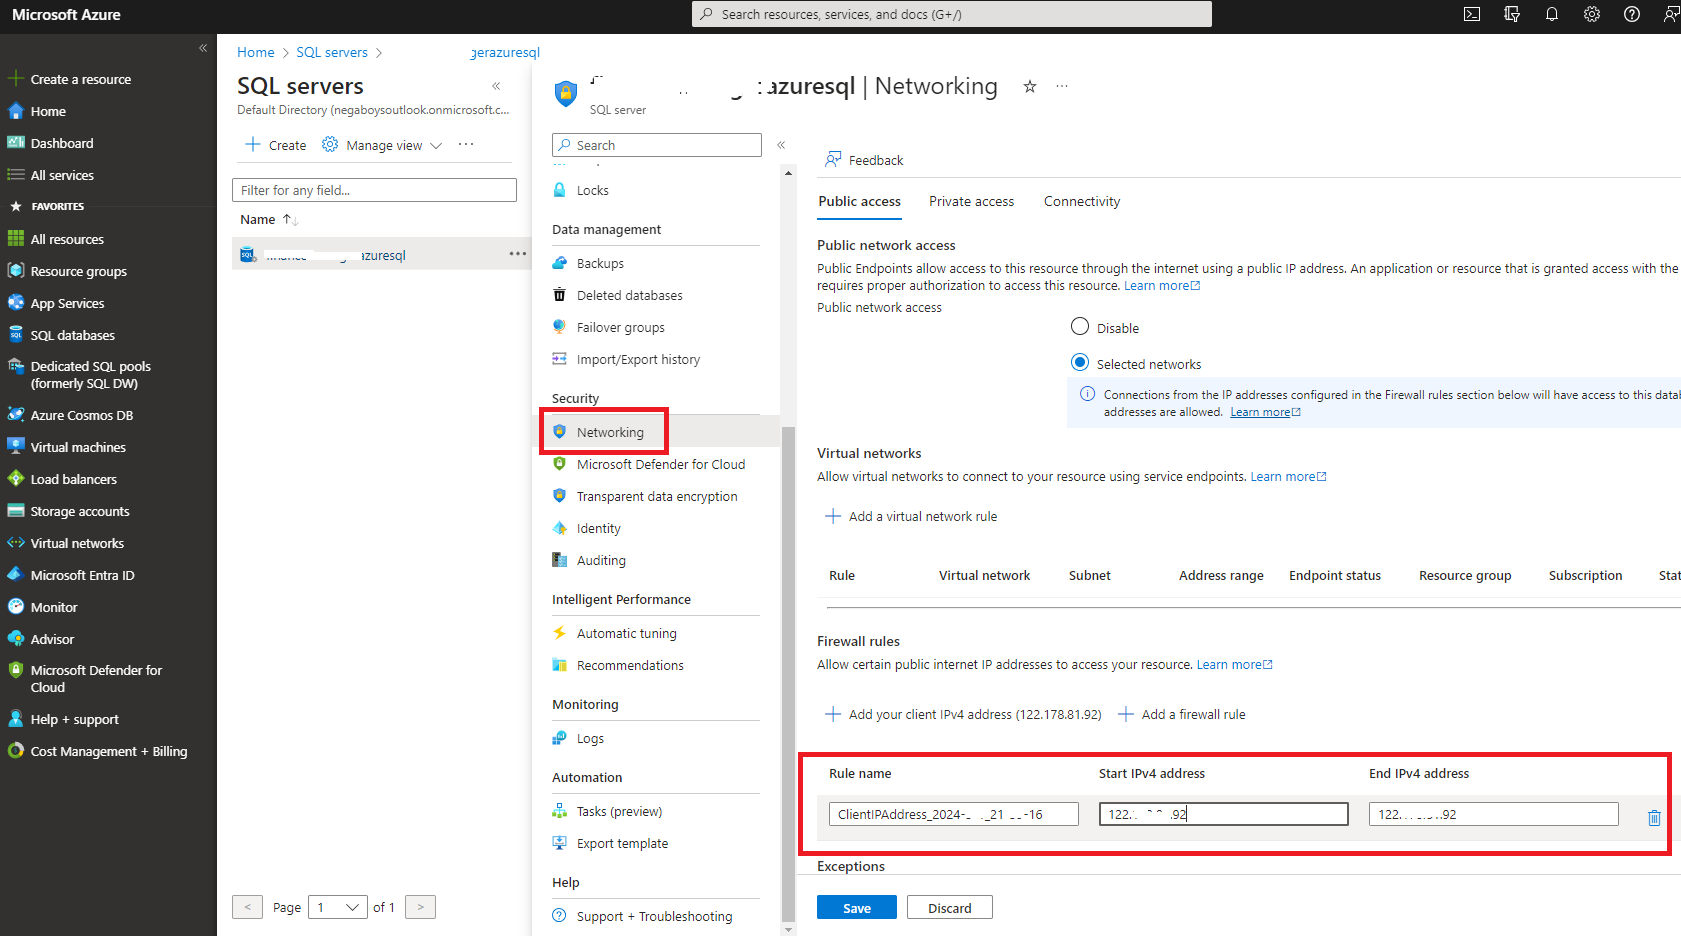
Select “Networking” from the left-side menu.
Under the firewall rules, enter the rule name and the start and end IP addresses of your client or local machine.
Fig 3. Azure SQL server - Networking
Save the changes.
Note:
Your client IP address will change frequently unless you’re using a static IP address.
Try to connect the SQL server from your client, and it should be able to successfully connect the SQL server and access the database.
]]>NEGAHow to enable PowerShell in Github Codespaces?2024-02-25T00:00:00+05:302024-02-25T00:00:00+05:30http://www.codetolive.in//github/powershell/codespaces/Enabling-the-powershell-in-Github-CodeSpacesAre you the one stuck with the below issue?
Unable to find the PowerShell in the GitHub codespaces terminal.
PowerShell is not available after installing the extension in the GitHub codespaces.
Not comfortable with Bash.
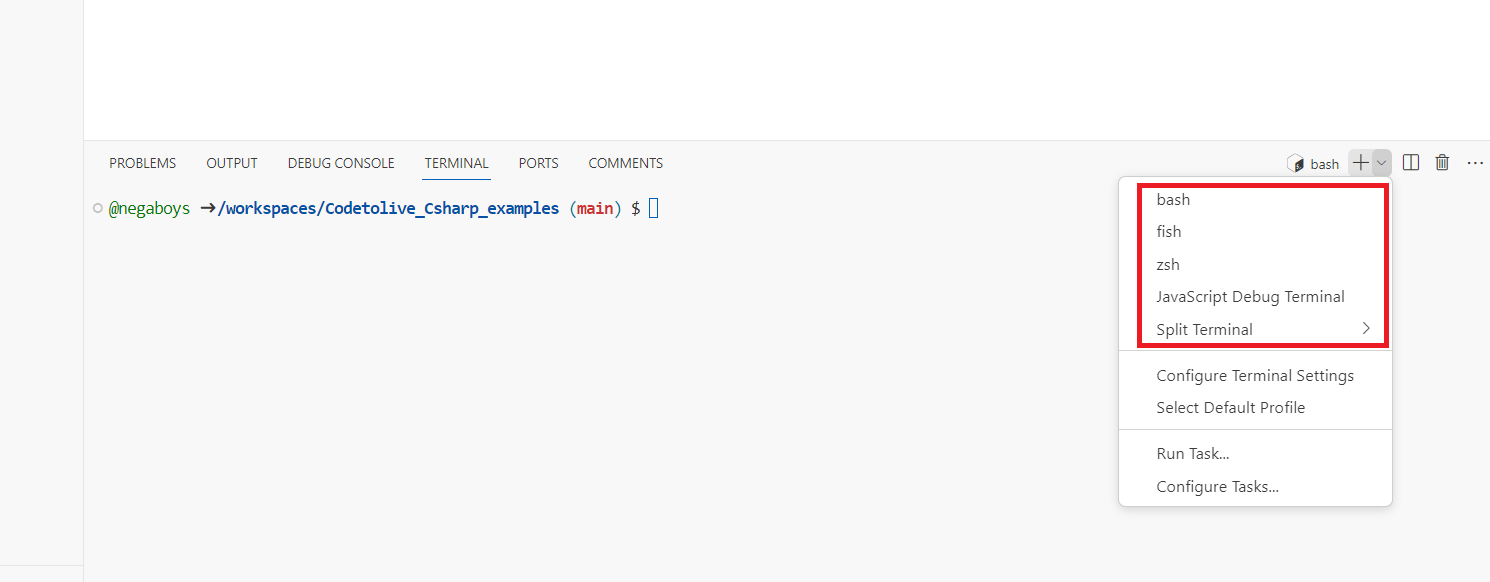
See the below image, the PowerShell option is missing in the CodeSpaces terminal and you're going to learn how to enable it now.
Fig 1. Github CodeSpaces - PowerShell missing
No worries. You can enable the PowerShell in the GitHub codespaces because many of us have done it already.
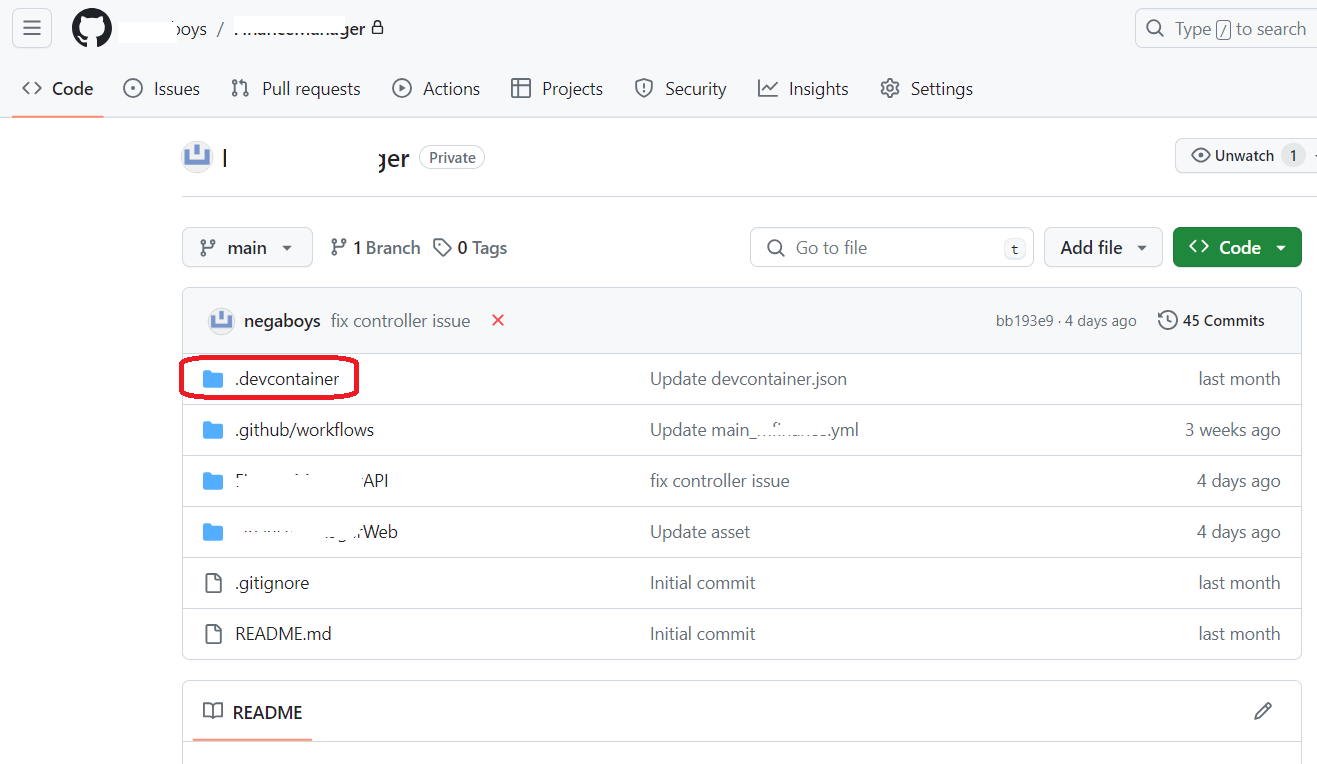
1. Go to your GitHub repository
Fig 2. Github repository - dev container
2. Open the “devcontainer.json”
Open the file "devcontainer.json".
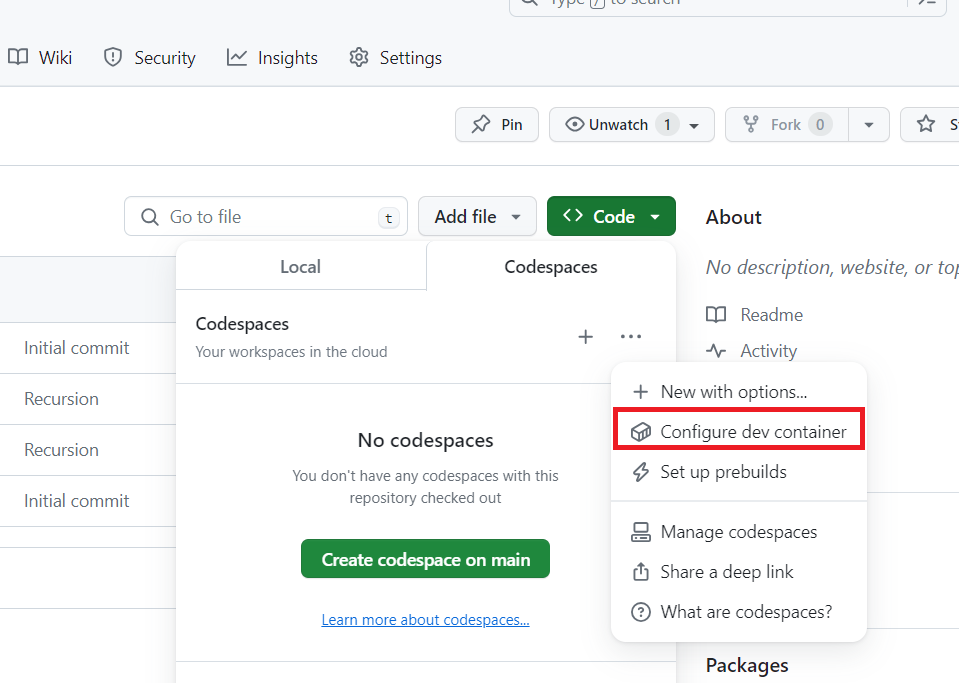
If you haven't configured the dev container already then configure the new one by selecting the "configure dev container" option under the CodeSpaces. Refer to the below image,
Fig 3. Github CodeSpaces - Add dev container
3. Launch your codespace
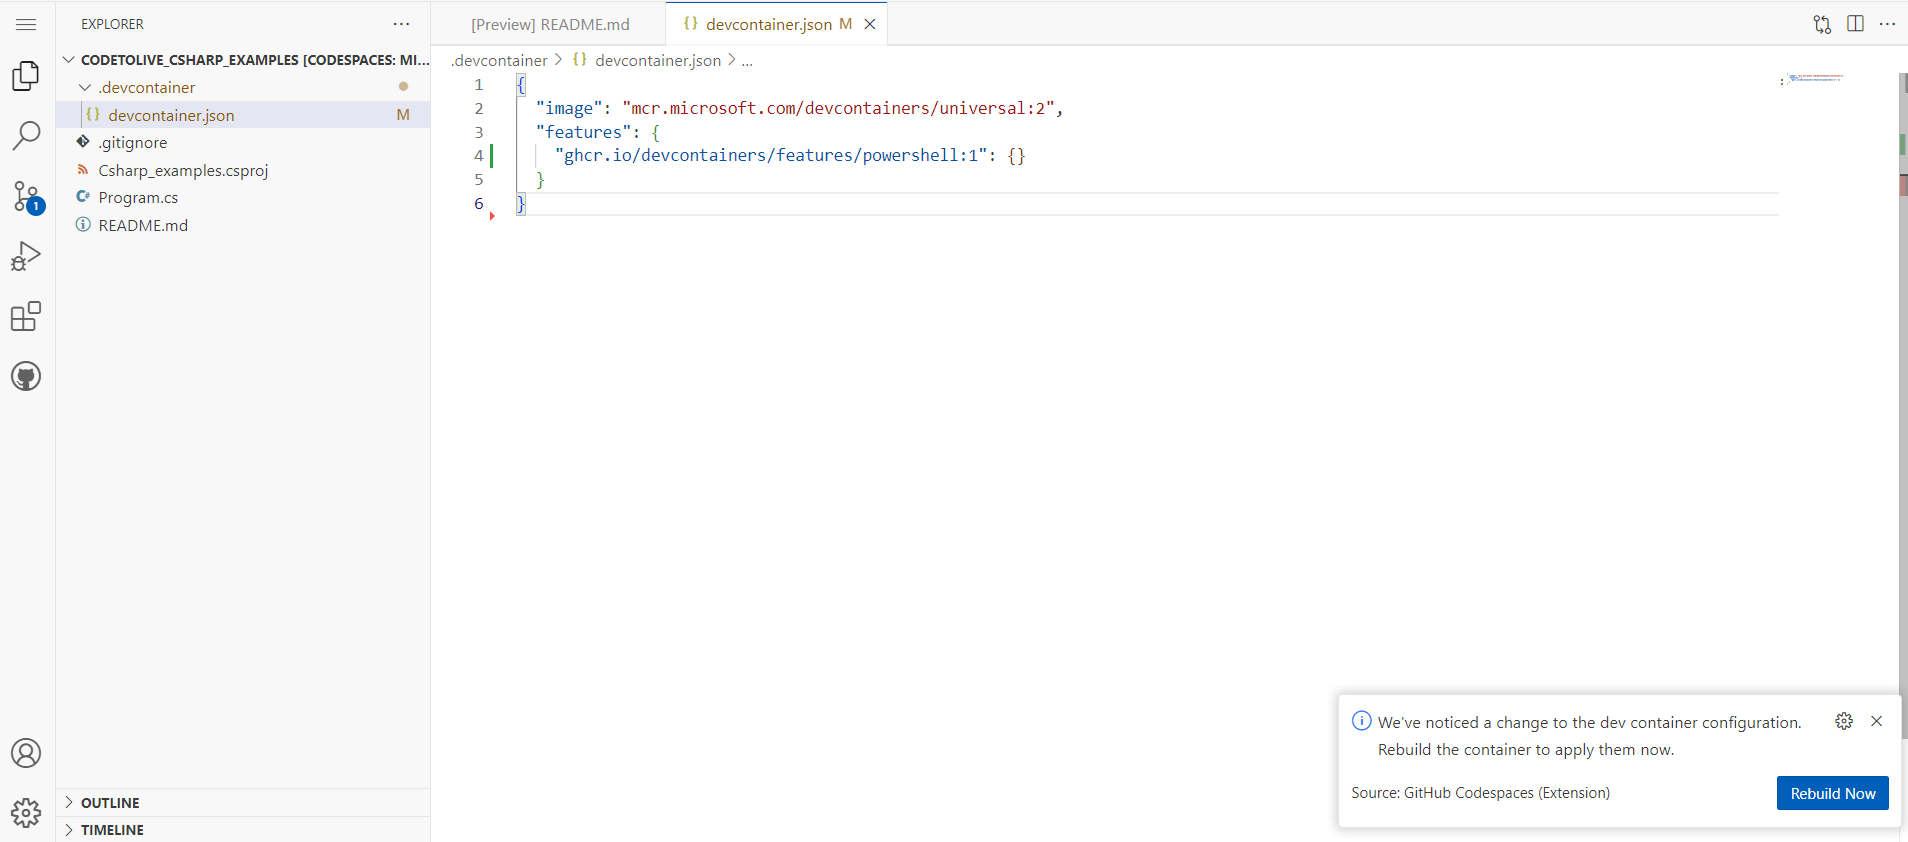
4. Add PowerShell to the dev container
Go to the devcontainer folder -> devcontainer.json and add the below lines to enable the PowerShell inside your container.
Fig 4. Github CodeSpaces - Add PowerShell and rebuild the container
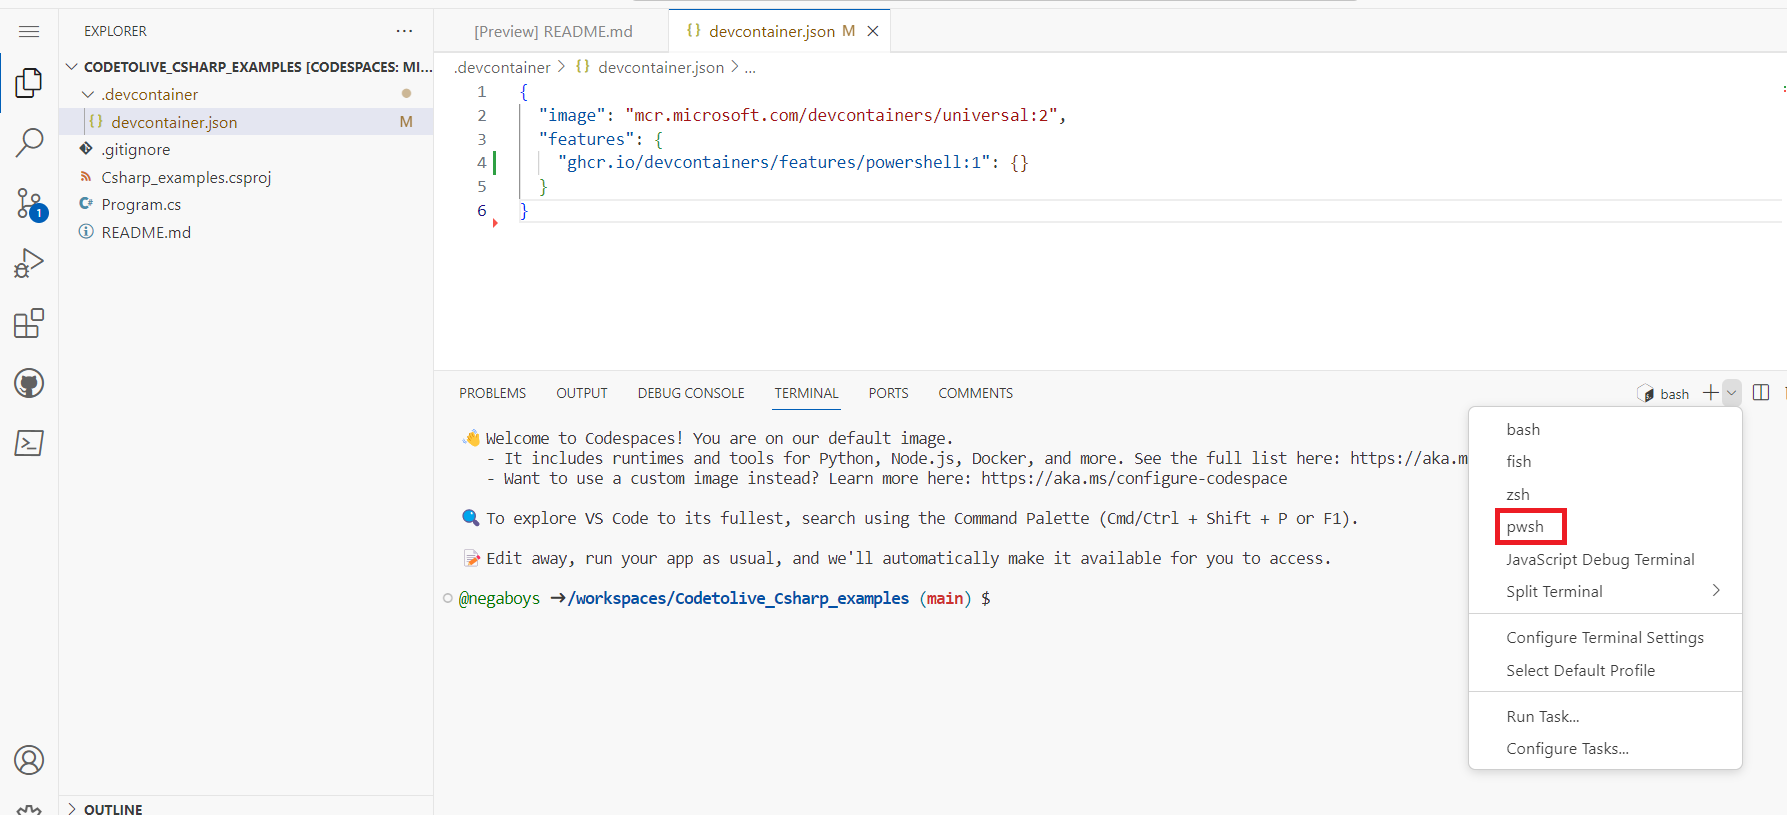
Here you go, the PowerShell is enabled in your GitHub CodeSpaces terminal.
Fig 5. Github CodeSpaces - PowerShell enabled]]>NEGAFailed to load API definition error in Swagger for ASP.NET Core2024-02-10T00:00:00+05:302024-02-10T00:00:00+05:30http://www.codetolive.in//.net/web%20api/swagger/Failed-to-load-API-definition-error-in-swaggerThere are various reasons cause the swagger to fail to load the API definition and you will get the error shared in the below screenshot. Below are the possible reasons,
Swagger misconfiguration
Controller methods without HTTP verbs (HttpGet, HttpPost etc.)
Same class name
etc…
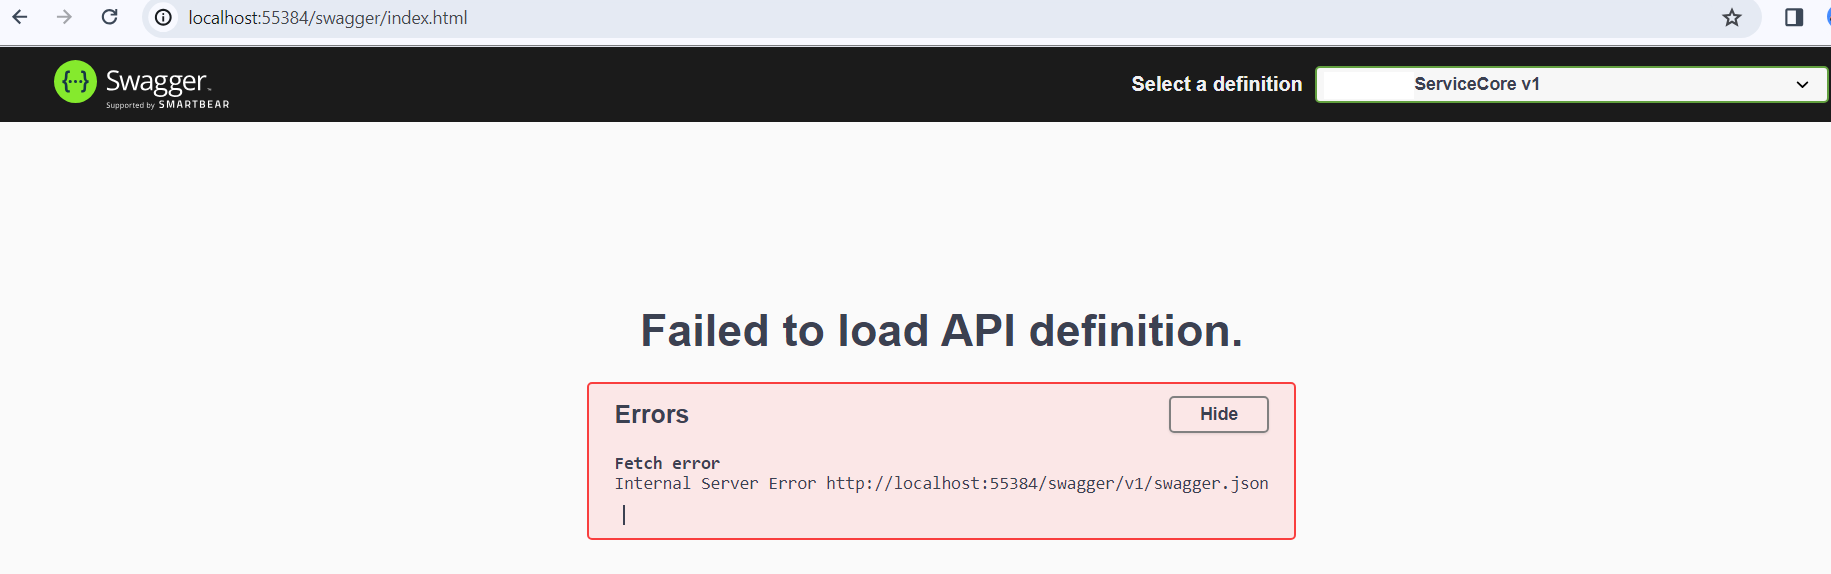
Fig 1. Failed to load definition error in Swagger
Solution:
The Swagger can be launched by adding the ‘/swagger’ after your API URL which doesn’t show the error details causing the Swagger to fail to load.
http://localhost:{PortNo}/swagger/index.html
If you navigate to ‘swagger/v1/swagger.json’ page you will see error details which helpful in addressing the issues.
http://localhost:{PortNo}/swagger/v{VersionNo}/swagger.json
Note: v1 is the version of your API. Change the version according to your API version.
Once all the issues are addressed then you can launch the Swagger URL to view the API definitions.
]]>NEGAAdding Swagger to ASP.NET Core Web API Project2024-02-04T00:00:00+05:302024-02-04T00:00:00+05:30http://www.codetolive.in//.net/web%20api/swagger/Adding-Swagger-to-ASP-NET-Core-Web-API-Project1. What is swagger?
Swagger is an open-source set of rules and specifications. It is used for API documentation and testing the API endpoints. Swagger UI generates documentation based on the Swagger specification and provides an interactive UI for testing APIs and experimenting with different parameters and options.
2. How to enable the swagger in .NET Core or .NET 7/8?
Go to the startup.cs file or program.cs file
Add the Swagger services under the ‘ConfigureServices’ method.
Add the following middleware under the ‘Configure’ method i.e., Swagger and Swagger UI.
Build and run the API.
Go to http://localhost:8080/swagger to view your API documentation from Swagger.
3. Adding swagger in ASP.NET Core WEB API Project
```

public void ConfigureServices(IServiceCollection services)
{
  // Swagger
  services.AddEndpointsApiExplorer();

  services.AddSwaggerGen(c =>
  {
      //c.SwaggerDoc("v1", new Info { Title = "API title", Version = "v1" });
      c.AddSecurityDefinition("Bearer", new OpenApiSecurityScheme
      {
          Description = @"JWT Authorization header using the Bearer scheme.
            Enter 'Bearer' [space] and then your token in the text input below.
            Example: 'Bearer xyztokenabc'",
          Name = "Authorization",
          In = ParameterLocation.Header,
          Type = SecuritySchemeType.ApiKey,
          Scheme = "Bearer"
      });

      c.AddSecurityRequirement(new OpenApiSecurityRequirement() {
      {
        new OpenApiSecurityScheme
        {
          Reference = new OpenApiReference
          {
            Type = ReferenceType.SecurityScheme,
            Id = "Bearer"
          },
          Scheme = "oauth2",
          Name = "Bearer",
          In = ParameterLocation.Header
        },
        new List<string>()
      }
  });

}

public void Configure(IApplicationBuilder app, IWebHostEnvironment env)
{
  if (env.IsDevelopment())
  {
    app.UseDeveloperExceptionPage();
    app.UseSwagger();
    app.UseSwaggerUI();
  }
  etc...
```
]]>NEGAThe visual Studio component cache is out of date, please restart Visual Studio.2023-12-23T00:00:00+05:302023-12-23T00:00:00+05:30http://www.codetolive.in//visual%20studio%20ide/ssms/The-visual-Studio-component-cache-is-out-of-date-please-restart-Visual-StudioProblem statement:
You may receive the following error when you try to open the New Query window in the Microsoft SQL Server Management Studio connected to the Microsoft SQL Server instance.
Fig 1. The visual Studio component cache is out of date, please restart Visual Studio.
Solution:
Option 1:
Open Run or Press the Windows key + R.
Type %temp%
Delete all the files from the temp folder.
You can open the New Query window in the SSMS, which will open without any issues.
Option 2:
Run the ‘Disk cleanup’.
Select the C:\ drive.
Make sure the ‘Temporary Files’ checkbox is selected.
Click OK.
Once the cleanup process is completed, you can try to open the New Query window in the SSMS.
]]>NEGAEncrypt and decrypt strings in ASP.NET Core using Data Protection.2023-10-14T00:00:00+05:302023-10-14T00:00:00+05:30http://www.codetolive.in//c%23/.net/web%20api/Encrypt-and-decrypt-string-in-ASPdotnetcore-using-dataprotection-csharp1. Introduction
The ASP.NET Core data protection provides the cryptographic API to encrypt and decrypt the string with a purpose key that includes key management, key rotation, etc. The key can be stored securely by encrypting with Windows DPAPI or in plain text, but it is not intended to be used for web applications because it has a Windows dependency on using DPAPI to encrypt or decrypt it. We will talk more in detail in this blog post, so please stay tuned!
2. What is Data Protection?
Data protection provides the cryptographic API mentioned in our introduction to encrypt and decrypt user data using the secure purpose key. There are two types of keys there:
A. Master key
B. Purpose
2.1. Master key
The master key exists in the key ring, which is used to protect and unprotect the payload. The key is generated by the data protection provider and stored in the configured location, i.e., inside your project directory, a shared location, Azure, etc. You can choose to encrypt the master key with the Windows DPAPI, but it can run only on the Windows machine, whereas it won’t work in non-Windows environments like Linux, etc.
2.2 Purpose
The purpose is to encrypt the data and use the same to decrypt it. Without purpose, the decrypted data cannot be reversed to the original string.
3. Two ways to use data protection in the ASP.NET Core app
3.1 With DI (Dependency Injection)
Register the DataProtection service in the startup class that injects the DataProtectionProvider interface in the constructor of the controller class or any class, and make use of it to create the protector to protect or unprotect the string.
3.2 Without DI (Dependency Injection)
Create the data protection using the DataProtectionProvider concrete class and make use of it in your controller to create the protector to protect or unprotect the string.
4. Data Protection with DI
4.1 Startup class
Register the Data Protection service with the directory info to store the key in the key ring in the given location. Also, there is a builder service option to set the application name to distinguish the key between your apps so that each app has individual keys; otherwise, the other apps will share the same key.
public void ConfigureServices(IServiceCollection services)
{
  // Data protection service for crptography
  services.AddDataProtection()
          .SetApplicationName("MyAppName")
          .PersistKeysToFileSystem(new DirectoryInfo(@"wwwroot/DataProtectionKeys"));
}
4.2 Data Protection custom Class
public class DataProtection {

  private IDataProtectionProvider _dataProtectionProvider;
  private IDataProtector _protector;

  // Data Protection class constructor
  public DataProtection(IConfiguration configuration, IDataProtectionProvider dataProtectionProvider)
  {
      // Create the data protector from data protection provider with the purpose key
      _protector = dataProtectionProvider.CreateProtector("MyPurpose");
  }

  // Encrypt the user data
  public string Encrypt(string data)
  {
      return _protector.Protect(data);
  }

  // Decrypt the protected data
  public string? Decrypt(string data)
  {
      try
      {
          return _protector.Unprotect(data);
      }
      catch (CryptographicException ex)
      {
          return null;
      }
  }
}
5. Data Protection without DI
5.1 Startup class
There is no need to register the Data Protection service in the startup class since some of the projects have different requirements and don’t want to use dependency injection. There is another approach to registering the data protection in the startup class and creating the data protector in the custom class that makes you create the data protection provider once in the project initial load. Comment below to share Method 3 if you are curious to know about it.
5.2 Data Protection custom Class
public class DataProtection {

  private IDataProtectionProvider _dataProtectionProvider;
  private IDataProtector _protector;

  // Data Protection class constructor
  public DataProtection(IConfiguration configuration)
  {
    // Creates the data protection provider and stores the generated key & other optional configurations
    _dataProtectionProvider = DataProtectionProvider.Create(new DirectoryInfo(@configuration.GetSection("DataProtection:KeyPath").Value), (builder) => { builder.SetApplicationName("MyApplicationName"); });

    _protector = _dataProtectionProvider.CreateProtector("MyPurpose");
  }

  public string Encrypt(string data)
  {
      return _protector.Protect(data);
  }

  public string? Decrypt(string data)
  {
      try
      {
          return _protector.Unprotect(data);
      }
      catch (CryptographicException ex)
      {
          return null;
      }
  }
}
6. Register Data Protection with Windows DPAPI to encrypt the master key
6.1 Startup class
Protect your key in the key ring with DPAPI
public void ConfigureServices(IServiceCollection services)
{
  // Data protection service for crptography
  services.AddDataProtection()
          .SetApplicationName("MyAppName")
          .PersistKeysToFileSystem(new DirectoryInfo(@"wwwroot/DataProtectionKeys"))
          .ProtectKeysWithDpapi();
}
7. Encrypt and decrypt string
7.1 Controller method using custom data protection class
public class UserController : ControllerBase
{
    IConfiguration _configuration;
    private IDataProtectionProvider _dataProtectionProvider;

    public PermissionController(IConfiguration configuration, IDataProtectionProvider dataProtectionProvider) {
        _configuration = configuration;
        _dataProtectionProvider = dataProtectionProvider;
    }

    /// <summary>
    /// Encrypt the string using the data protection class
    /// </summary>
    /// <param name="data"></param>
    /// <param name="purpose"></param>
    /// <returns></returns>
    [HttpGet]
    public ActionResult<string> Encrypt(string data, string purpose)
    {
        if(purpose != Constants.DataProtection.Purpose)
        {
            return BadRequest();
        }

        DataProtection dataProtection = new DataProtection(_configuration, _dataProtectionProvider);
        return dataProtection.Encrypt(data);
    }

    /// <summary>
    /// Decrypt the encrypted string using the data protection class
    /// </summary>
    /// <param name="data"></param>
    /// <param name="purpose"></param>
    /// <returns></returns>
    [HttpGet]
    public ActionResult<string> Decrypt(string data, string purpose)
    {
        if (purpose != Constants.DataProtection.Purpose)
        {
            return BadRequest();
        }

        DataProtection dataProtection = new DataProtection(_configuration, _dataProtectionProvider);
        var decryptedString = dataProtection.Decrypt(data);
        if(decryptedString == null)
        {
            return BadRequest();
        }
        return decryptedString;
    }
}
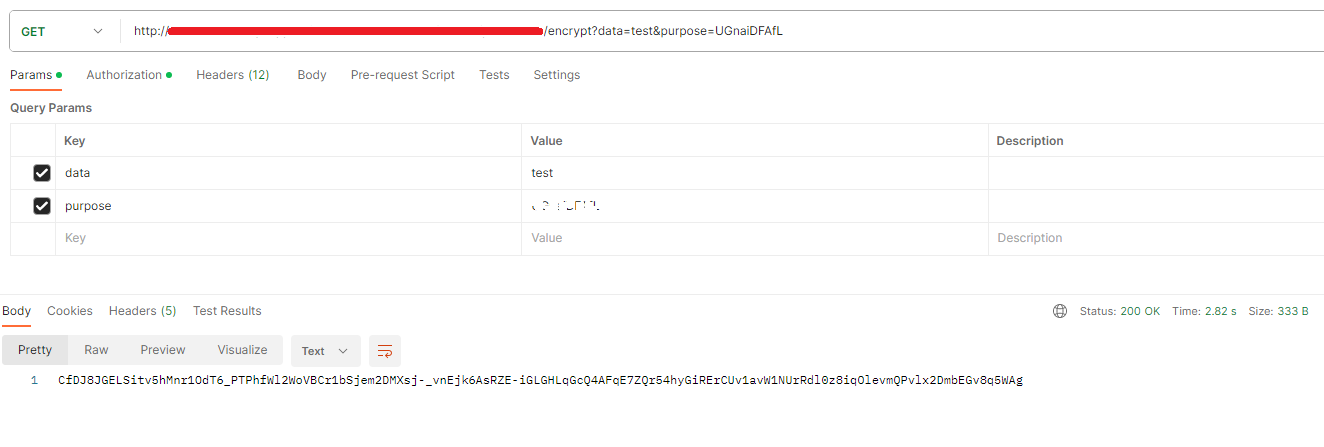
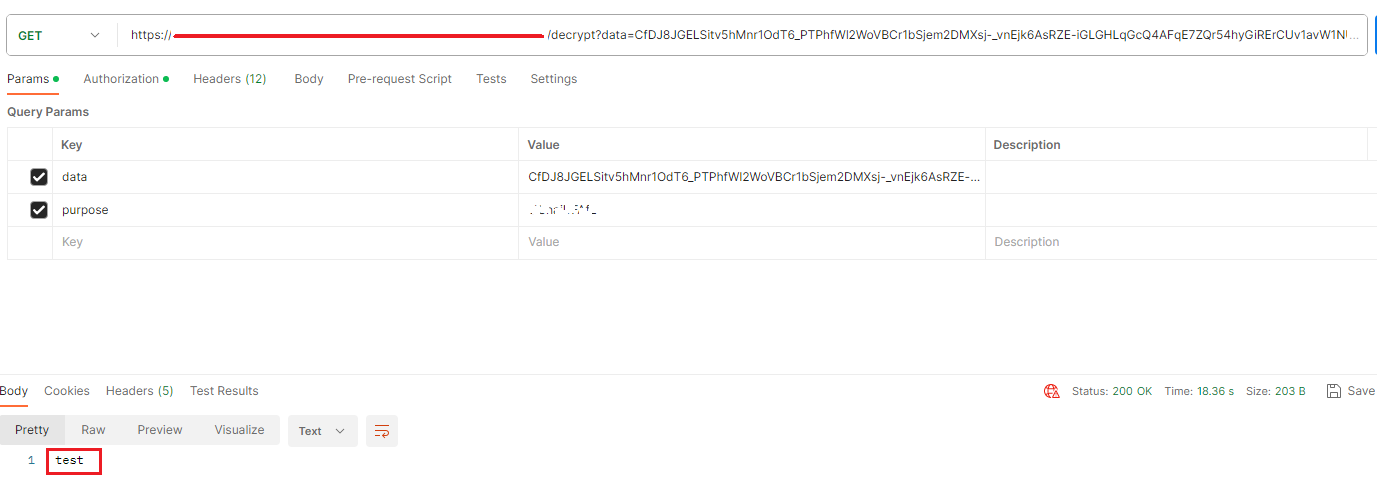
7.2 Output
7.2.1 Postman results of encryption
Fig 1. Encryption using ASP.NET Core Data Protection
7.2.2 Postman results of decryption
Fig 2. Decryption using ASP.NET Core Data Protection
Note:
Instances of the DataProtectionProvider concrete type are expensive to create. If an app maintains multiple instances of this type and if they’re all using the same key storage directory, app performance might degrade.
Thanks for reading the article on Data Protection to Protect User Data in the ASP.NET Core. Please feel free to drop your comments below, and you can follow us on Twitter (@Codetoliveblog) to receive the latest updates from this blog.
]]>NEGAIHeaderDictionary does not contain a definition for Referrer and no accessible extension method Referrer accepting a first argument of type IHeaderDictionary could be found (are you missing a using directive or an assembly reference2023-09-17T00:00:00+05:302023-09-17T00:00:00+05:30http://www.codetolive.in//c%23/.net/web%20api/IHeaderDictionary-does-not-contain-a-definition-for-Referrer-in-dotnetcore1. Problem statement
‘IHeaderDictionary’ does not contain a definition for ‘Referrer’ and no accessible extension method ‘Referrer’ accepting a first argument of type ‘IHeaderDictionary’ could be found (are you missing a using directive or an assembly reference?
Referrer is missing in the ‘IHeaderDictionary’ when using the .NET Core or .NET projects.
2. Context
A request header is an HTTP header that can be used in the HTTP request to pass additional information. The header can be sent from the client, and the same can be read from the server to retrieve the information.
The way of reading the header has been changed in the .NET Core and .NET projects.
3. Solution
Existing code:
Request.Headers.Referrer.ToString()
Fix:
Request.Headers["Referrer"].ToString();
Thanks for reading the article on fixing the request header issue in an ASP.NET Core project. Please feel free to drop your comments below, and you can follow us on Twitter (@Codetoliveblog) to receive the latest updates from this blog.
]]>NEGAUsing static files in ASP.NET Core2023-09-09T00:00:00+05:302023-09-09T00:00:00+05:30http://www.codetolive.in//c%23/.net/Using-static-files-in-ASP-NET-CoreINDEX
Context
Static files
WWWroot folder
Enable the static files in the ASP.NET Core project
Reading static files
1. Context
Using static files in an ASP.NET Core project from the wwwroot folder using the IwebHostEnvironment’ interface inside the controller or service
2. Static file
The static files are the assets of the project, like HTML, CSS, JS, images, Excel, etc.
3. WWWroot folder
The static files are stored in the wwwroot folder in the project directory. The web root folder, i.e., wwwroot is the base path of the public and static resource files like Javascript (.JS), stylesheet (.css), etc.
4. Enable the static files in the ASP.NET Core project
‘UseStaticFiles’ in the startup will enable the static files to be served in the application.
Program.cs,
var builder = WebApplication.CreateBuilder(args);

var app = builder.Build();

app.UseStaticFiles();
5. Reading static files
You can use the ‘IwebHostEnvironment’ interface to read the static files from the wwwroot folder in the ASP.Core project. Inject the interface through dependency injection from the startup class and access it in the controller or service class.
The below code snippet reads the static files from the web root folder using the IwebHostEnvironment interface.
UserController.cs,
using Microsoft.AspNetCore.Hosting;

IWebHostEnvironment WebHostEnvironment;

// User controller constructor
public UserController(IWebHostEnvironment webHostEnvironment) {
    WebHostEnvironment = webHostEnvironment;
}

// Get user list
[HttpGet]
public void GetUserList(string fileName){
  // Read the static file from the wwwroot folder
    var serverPath = WebHostEnvironment.WebRootPath + "\\image\\business\\" + fileName;
}
Thanks for reading the article on using static files in an ASP.NET Core project. Please feel free to drop your comments below, and you can follow us on Twitter (@Codetoliveblog) to receive the latest updates from this blog.
]]>NEGAHow to Access the HttpContext in a Class Library in ASP.NET Core?2023-09-02T00:00:00+05:302023-09-02T00:00:00+05:30http://www.codetolive.in//c%23/.net/How-to-Access-the-HttpContext-in-a-Class-Library-in-ASP-NET-CoreINDEX
Context
Using the IHttpContextAccessor
Accessing HttpContext via Dependency Injection
Accessing HttpContext via Dependency Injection in a static class
Considerations
1. Context
In ASP.NET Core, the HTTP context cannot be accessed directly in the class library because it is a transient object that is available in the context of an HTTP request.
2. Using the IHttpContextAccessor
You can use the HTTPContext in a class library by injecting the IHttpContextAccessor to your class via the dependency injection from your startup class. Once you have injected the IHttpContextAccessor service into your class library, the HttpContext can be accessed from any method in your class.
3. Accessing HttpContext via Dependency Injection
Inject the HttpContextAccessor from the startup class and access it in the class library constructor.
3.1 Startup class
public void ConfigureServices(IServiceCollection services) {
    services.AddHttpContextAccessor();
}
3.2 Class library (user.cs)
public class User {
    private readonly IHttpContextAccessor _httpContextAccessor;

    public User(IHttpContextAccessor httpContextAccessor) {
        _httpContextAccessor = httpContextAccessor;
    }

    public void GetUserList() {
        // Get the current HttpContext from the IHttpContextAccessor
        var httpContext = _httpContextAccessor.HttpContext;

        // Use the httpContext to access the stored items etc.
    }
}
4. Accessing HttpContext via Dependency Injection in static class
In a static class, the class is not instantiated and doesn’t create a new instance so it won’t call the constructor; hence, we can directly access the HttpContextAccessor within the static class.
4.1 Startup class
public void ConfigureServices(IServiceCollection services) {
    services.AddHttpContextAccessor();
}
4.2 Static class library (user.cs)
public static class User{

private HttpContext _httpContext => new HttpContextAccessor().HttpContext;

    public void GetUserList(){
        // You can access the HttpContext from _httpContext here.
    }
}
5. Considerations
HttpContext is a huge object and accessing it can have a negative impact in the performance. Inject the IHttpContextAccessor when you need to access the HttpContext.
Dispose of the IHttpContextAccessor when you are finished with it.
Thanks for reading the article about accessing the HttpContext in the class library via dependency injection. Please feel free to drop your comments below, and you can follow us on Twitter (@Codetoliveblog) to receive the latest updates from this blog.
]]>NEGARecursion in C#2023-08-27T00:00:00+05:302023-08-27T00:00:00+05:30http://www.codetolive.in//c%23/dsa/Recursion-in-C#%20copyINDEX
What is a recursion?
Simple recursion
Example: Power
Example: Factorial
Download samples
1. What is a recursion?
Recursion is the process of calling the same function repeatedly until it meets the break condition. It is similar to the loop in that it will call the same function as the loop to iterate the counter and end the iteration after it meets the condition.
function x(){
....
x();

}
2. Simple recursion
Simple recursion to demonstrate recursion in C#. It will iterate the number by decrementing a number and break the condition once it reaches the number = 0.
2.1 Code
using System;

namespace Codetolive.Csharp.Examples{

    public class CsharpExamples
    {
        public static void Main(string[] args){
            SimpleRecursion(5);
        }

        /**
        Simple recursion to demonstrate the recursion.
        The method iterates over the input number until it reaches zero.
        **/
        public static void SimpleRecursion(int number){

            if(number == 0){
                return;
            }

            SimpleRecursion(number-1);
            Console.WriteLine(number);
        }
    }
}

Output:
1 2 3 4 5
3. Example: Power
Recursion method to calculate the power of the number
3.1 Code
using System;

namespace Codetolive.Csharp.Examples{

    public class CsharpExamples
    {
        public static void Main(string[] args){

          var powerResult = Power(2, 3);
          Console.WriteLine(powerResult);
        }

        /**
        Recursion method to calculate the power of the number
        **/
        public static int Power(int number, int power){

            if(power == 0){
                return 1;
            }

            return number * Power(number, power - 1);

        }
    }
}

Output:
2 Power 5 = 2 x 2 x 2 x 2 = 32
4. Example: Factorial
Recursion method to calculate the factorial of the number
4.1 Code
using System;

namespace Codetolive.Csharp.Examples{

    public class CsharpExamples
    {
        public static void Main(string[] args){

            var factorialResult = Factorial(5);
            Console.WriteLine(factorialResult);
        }

        /**
        Recursion method to calculate the factorial of the input number
        **/
        public static int Factorial(int number){

            if(number == 0){
                return 1;
            }

            return number * Factorial(number - 1);

        }
    }
}

Output:
Factorial of 5 = 5 x 4 x 3 x 2 x 1 = 120
5. Download samples
Download the above code samples from our GIT repository - Download
Thanks for going through the recursion tutorial. Please feel free to drop your comments below. You can follow our twitter (@Codetoliveblog) account to receive the latest updates from this blog.