
How to setup a custom domain on blogger with GoDaddy?
You can purchase a new domain from GoDaddy, BigRock, or any other domain provider and follow the below steps to configure the custom domain in the Blogger platform.
- Sign in to Blogger
- Select the blog to configure the custom domain
- Click the Settings and go to the publishing section.
- Under the publishing section, click “Set up a third-party URL for your blog”
- Enter the URL of the domain you have purchased in GoDaddy or BigRock or any other domain provider.
- Click the Save button
Now, You will get an error regarding the CNAME.
On your domain registrar website, locate your Domain Name System (DNS) settings and enter the following two CNAMEs:
Name, Label, or Host field Destination, Target, or Points to field
www ghs.google.com xxxxxxxxxxxxxxxxxxxxxxxxxxxxxx.googlehosted.com
Step 1: Go to the Domain provider website and login to your account. Find the DNS Management
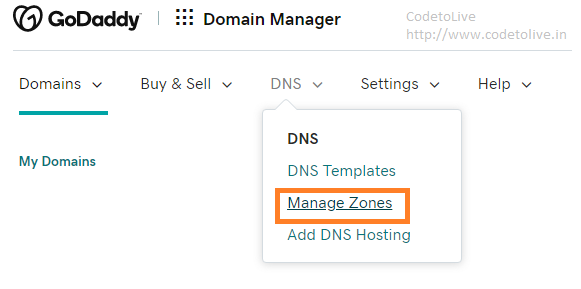
Add your CNAME under the Records section,
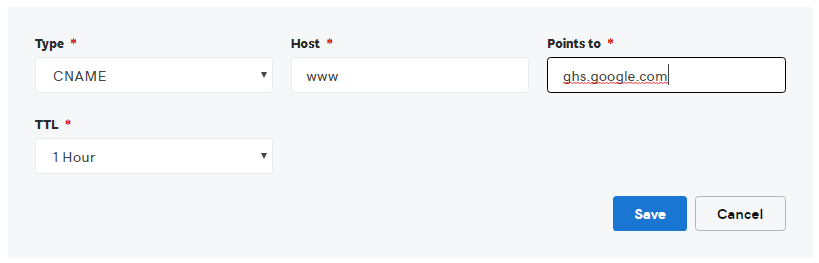
Similarly, you can add to the other CNAME. Please wait for at least an hour for your DNS settings to activate.
Step 2: (optional) To change your domain (example: mydomain.com) to www.mydomain.com, setup a naked redirect.

Add the below four A-records which point to Google IPs.
- 216.239.32.21
- 216.239.34.21
- 216.239.36.21
- 216.239.38.21
Go to the blogger again and select your blog. Click the settings and go to the publishing section. Check “Redirect domain.in to www.domain.in”
Your blog will now point to your domain name and start working after the DNS settings get activated.
Happy domain working :-)
Leave a comment